
Remote Mode
Tap to cycle through the options:
Camera Controls: Allows you to control supported cameras via the screen of your NINJA V. Refer to the section below for ATOMOS Camera Menu Control for ZCAM Series cameras.
Calibration: Every brand of monitor in the field and in the editing suite naturally drifts in color over time. ATOMOS have partnered with calibration leader Calibrite to open up professional monitor calibration to all filmmakers. For information on how to calibrate your NINJA V and to purchase a Calibrite i1 Display Pro, visit atomos.com/accessories/x-rite-i1-display-pro
Lanc: For remote operations via the Remote/Calibration Port, ATOMOS supports both LANC in Sony and Canon format. The NINJA V uses LANC Client so a LANC controller must first be attached to a camera and the output connected via a Y cable to the NINJA V.
Calibration and LANC will appear as one option: 'Calibration/LANC'
ATOMOS Camera Menu Control for Z CAM Series cameras
When using your NINJA V with Z CAM E2 series cameras, you can control your camera via the screen of your NINJA V.
How to enter camera control mode on NINJA V to control a Z CAM camera:
Use an HDMI cable that supports 4Kp60 to connect the output of the Z CAM to the HDMI input of your NINJA V.
Connect the 3.5mm end of an ATOMOS USB-C to Serial LANC cable to the Remote/Calibration Port on your NINJA V, and the USB-C end of the cable to the USB Type-C port on the Z CAM.
Power on your Z CAM and navigate to RAW over HDMI in the Record menu, to ensure that it is turned off.
RAW over HDMI must be disabled for camera menu control to work.
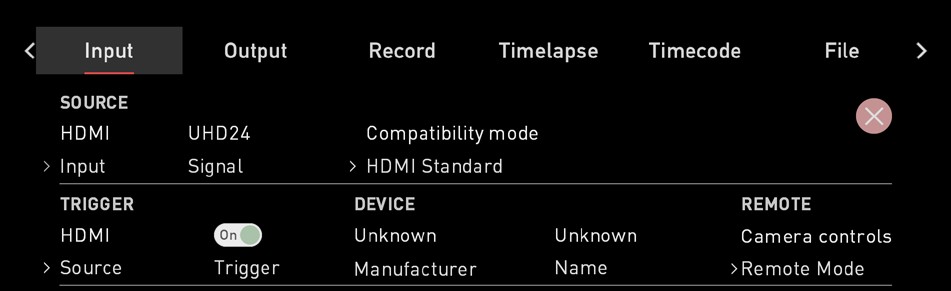
Power on your NINJA V and select Compatibility Mode in the Input menu at HDMI Standard. Remove the HDMI cable from the Z CAM and re-attach it to ensure that the signal is locked correctly.
Tap on Remote Mode on the Input page to select Camera Controls, then tap on the blue Camera icon on the bottom of the screen to enter camera control mode.

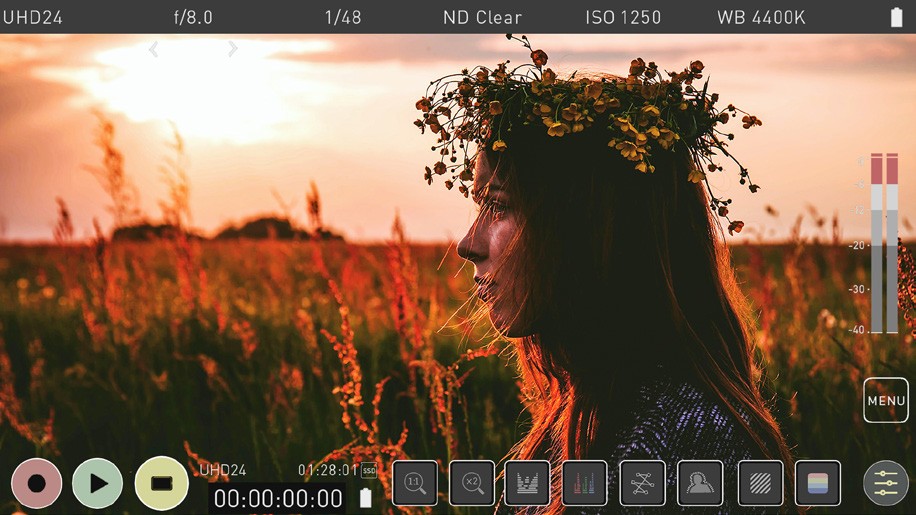
Your NINJA V will display the Z CAM camera settings and a camera battery status icon across the top of the screen, with audio meters and a Menu icon on the right hand side. The information that is normally displayed across the top of the screen like video input, media, timecode and battery status will now be displayed on the bottom of the screen.

How to control a Z CAM camera with camera control mode on NINJA V:
Once you have entered the camera control mode, you can manually adjust the settings of your ZCAM from the display of your NINJA V. Tap one of the settings across the top of the screen like aperture, shutter speed, ISO or WB to bring up the adjustment arrows below the selected setting. Tap on the left or right arrow to adjust the values for the setting.

Auto ISO / Auto WB
When you adjust the settings for ISO or WB, an additional Auto ISO or Auto WB icon will appear on the right side of the screen. If you tap on this icon, it will enable the automatic ISO or automatic WB mode respectively. The icon will have a white border, and an ‘A’ will be displayed beneath ISO or WB when enabled. Tap the icon again to disable the automatic mode.


Access the Z CAM Menu from the display of NINJA V
Tapping on the Menu icon on the right side of the screen will bring up some icons that replicate the physical buttons on the top of the ZCAM. The operation of these buttons are the same as the physical buttons.

Tap on the Menu icon in this view to bring up the Z CAM menu on your NINJA V screen. This is the same menu that appears on the screen of the Z CAM when you press the physical Menu button on the Z CAM. Tap on the icons to navigate through the ZCAM menu system and adjust settings, the same way you would when using the physical buttons on the ZCAM. Tap on the Menu icon again to hide the menu, and tap on the Return arrow icon on the right side of the screen to return to the previous screen.

Comments
0 comments
Please sign in to leave a comment.